
Aperture cards are the lesser-known type of material in the microform family. The “family” includes microfilm, microfiche, and aperture cards, with microfilm being the most commonly recognized of the three.
Each microform type has its place in the records management world, and in this article we’re focusing specifically on aperture cards to give you a more detailed understanding of this particular data storage medium, including variations of aperture cards, indexing/naming methods, and digital scanning costs.
If you’re more of a video person, click below to watch us
tell you all there is to know about aperture cards.
What Are Aperture Cards?
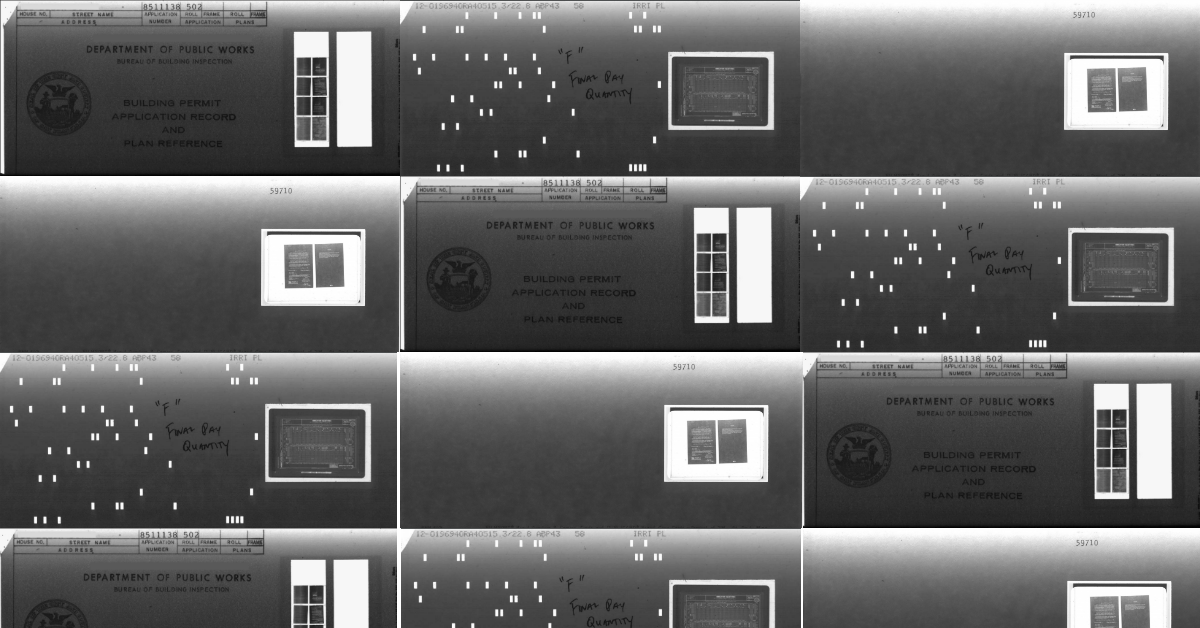
Aperture cards are a type of microform that are created by inserting a microfilm image into a hole, or “aperture,” on a piece of cardstock.
Cards are roughly 7.5” L x 3.25” W and come in two general formats: Hollerith and standard, which we’ll get to in the “Types of Aperture Cards” section below.
Aperture cards are most often used for large-format images such as engineering drawings and building plans. The frame (aperture) allows for a 35mm image to be inserted, and the card index information can describe specifics about the image without needing to view the actual image.
You can check out other aperture card-related frequently asked questions here.
Types Of Aperture Cards
The most common aperture card is the 35mm variety because of the heavy use of these cards for information related to large-format images such as engineering drawings, building plans, and other such types of information. When 35mm images are used, you’ll see one image per frame.
")
35mm aperture card
16mm aperture cards exist, though are much less common than their 35mm sibling. There are really two kinds of 16mm aperture cards: those with a 35mm but 16mm images, and those with channels specifically designed for 16mm images.
In the first case, a 35mm frame, you might see one or a few smaller images that look like they were photographed next to each other, and you’d be correct. Occasionally microfilm would be made by using a 35mm camera to capture multiple office size or smaller records next to each other, to save film. If this is what you have and you want to digitize your aperture cards, you’ll need to decide if you’re okay with having a single image per frame (potentially multiple smaller images in one digital file), or if you want each individual record “cropped” into a separate digital file. Cropping is more expensive, so it’s a cost/benefit tradeoff.
The other type of 16mm aperture card is one in which the card is specifically made for 16mm images. These are rare, and even we’ve only seen them once in our decades in business.
")
16mm aperture card
Hollerith aperture cards have multiple holes in them where the card was punched to indicate index and naming values. Some Hollerith cards also have the holepunch information written on the title block on the top of the card.
Standard aperture cards don’t have the Hollerith hole punches. They normally have the image index information on the top of the card in the title block – if they don’t, viewing the image will be required to see the information.
Take a look at our “What Kind of Microfilm Do I Have?” page and scroll down to the “aperture card section” for additional info.
How Many Do I Have?
A quick way to determine how many aperture cards you have is to measure them.
Get out a ruler, squeeze together an inch of cards, and count them out. You’ll probably have about 100 cards in that inch.
Next, measure out the total linear inches or feet that you have of aperture cards, and do the math to get an estimated total.
Example: 100 cards per inch. 80 inches of cards. 100 x 80 = 8,000 cards.
Take a look at our page that describes this in detail and also describes some common quantities that are stored in aperture card cabinets, if that’s what you’re using.
How To Index
Indexing is the method in which you name a file or record – in this article we’re specifically covering the ways in which you can index your aperture card files once they’ve been digitally scanned into electronic images.
Hollerith
If you have Hollerith aperture cards, you can capture the index information right from the hole punches using a specific aperture card scanner. This unique scanner captures the Hollerith data and turns it into digital index information. Be aware that if the Hollerith data is incorrect, that’s what’s going to come out. Also, the Hollerith data sometimes doesn’t even read, so a card with punches might still turn out as no data.
Title block
If there is no Hollerith, or if the Hollerith is suspect, the title block at the top of the card can be used. Information related to the image should be up here, such as a street name and street number, Assessor Parcel Number (APN), project number, and so on. This information can be captured through manual keying after the card has been scanned.
Writing on card
Cards might have typed or handwritten information on other parts of the card that’s not the title block. If you need this captured then it just needs to be known prior to the project so that it’s understood that the info is important.
Image
The image may contain the information you need, even if there is Hollerith, title block, and/or writing on the card. If that’s the case, the scanned image will be reviewed to capture and key the required information.
Framing / Cropping
Aperture card conversion involves scanning the card and capturing the record in the frame (the “aperture”) to create a new digital image.
In most cases, the image is a single record (such as an engineering drawing or other large-format document photographed on 35mm microfilm) and will be the only image within the aperture. In this case, the “framing” of the digital image is simple because it will be the entire aperture: one frame, one image.
One image per frame
In other cases, there may actually be multiple images within the aperture: one frame, multiple images. These are 16mm images and can be arranged in various layouts, but the main point is that there is more than one record on the card. When scanned, the 35mm aperture is always captured and transformed to digital – however, because you have multiple 16mm images within the 35mm frame, you’ll need to make a choice of how to convert those images.
")
Multiple images per frame
One option is leaving the digital scan as-is, just like it is on the card: multiple pages presented as a single image. This has its benefits, because at this point you’re done with the conversion. The downside is that each record is not full-size and presented as a normal digital file.
The other option is to have each individual record cropped so that they become their own digital images. For example, you may have an aperture card that has four unique records within the 35mm frame. If you decide to have each record cropped after scanning, you’ll end up with four distinct images. Because this method requires additional manipulation after scanning, it usually costs more than standard scanning services, but the benefit is that you have individual digital files that can be used more effectively and organized as needed.
Scanning Costs
At a high level, aperture card scanning costs around $0.25 – $0.75/card depending on numerous factors and how you want your project to go.
One of the most critical factors influencing price is how many aperture cards you have scanned. If you have 100s of thousands of cards to scan, your per card cost will be at the lower end of the price range, but if you have a smaller amount, say 10,000 cards, you’ll be at the higher end.
Indexing is another piece of the puzzle that can heavily weigh your final price. Simply put, the more complex your indexing requirements, the more expensive your project will be. With aperture cards, indexing is interesting because you might have Hollerith punch cards that can be machine-captured, or you may have to key data from the actual image (see the “How To Index” section earlier in this post). If you have Hollerith cards, your indexing could be minimal, but if you need us to capture data from the images in the aperture, be prepared to pay more.
Final Product: Traditional Output vs. Digital ReeL
One last bit that we wanted to touch on was the end result of your scanning project. When most folks think of “scanning and digital conversion,” the classic image that pops up is a PDF or TIF file. This is a common approach and one that we call a “traditional” conversion. Additionally, there’s another method, the “Digital ReeL” approach.
With a traditional aperture card conversion, what you’re going to get as a final product is folders of digital documents (PDF TIF, or JPG files) named by one of the methods we listed above. When you click on a file, the digital image will be presented for you to review. If you requested it during your project, you might also have multi-page files as the result of combining related cards. What you won’t get is an image of the physical card, the original record that is the basis for the digital image.
When you choose Digital ReeL, you’re getting not only the digital image of the record that you’d get in a traditional conversion, but also a virtual replica of the original hard copy aperture card. This is critical to provide you with the historic context of the data if you ever need to verify the image or indexing is accurate. And even if you want PDFs or TIFs as your primary digital copy, you can use Digital ReeL as a backup disaster recovery dataset or as an augment to your existing electronic records management method.
There’s no right or wrong way to scan your aperture cards – we’ll give you options and recommendations, but it’s up to you to decide which method of digitizing your documents is the way that’ll work best for you. For more details about traditional vs. Digital ReeL conversion, take a look at our page to learn more.
Next Steps
Reach out to us today! Click the “Get Your Quote” button below, fill out the form, and we’ll quickly reply to you to discuss your project.
Further Reading
Check out these other articles related to aperture cards and digital conversion:
“How Much Does Aperture Card Scanning Cost?” details the 9 factors that will affect the price you pay to have your aperture cards digitized.
“How To Choose The Right Microfilm Scanning Partner” is an overview of various things you should look for when choosing your scanning partner. We say microfilm, but this applies to aperture cards, as well.
“Digital File Formats & Conversion Project Delivery” outlines various ways you can have your digital images delivered. It’s good to know what you want to end up with at the end of your project, and this provide some ideas for you.