
Are you trying to figure out how much it’ll cost you to scan your aperture cards into digital files? In this third entry in our “cost” series, we’ll give you a good idea of what it’ll cost to get your aperture cards scanned. Once you have a ballpark price, you can decide if a digitization project is in your budget or if you just want to keep working with the physical records.
Aperture cards are often the third wheel of the microform community: microfilm is the most well-known, followed by microfiche. Then there are those card things, with the film piece on the right, with some holes in the card… Being a bit facetious here, but this not far from how we know that the person we’re talking to has aperture cards! Ap cards are less known than microfilm and microfiche, but they’re just as prevalent and have many similarities.
Another of our pages, How Much Does Microfilm Digitization Cost?, provides you with high-level scanning fees for all three microform types (microfilm, microfiche, and aperture cards). Here we’ll cover the different aspects of aperture card scanning that’ll affect your price so you can come away with a general idea of what it’ll cost you to have your cards digitized.
For details on microfilm scanning costs, go to “How Much Does Microfilm Scanning Cost?” For details on microfiche scanning, go to “How Much Does Microfiche Scanning Cost?”
General Aperture Card Scanning Price
The general price range you can use for aperture card scanning is below:
$0.25 – $0.75/card
If you have cabinets full of cards or a bunch of boxes in a closet loaded full, you can figure out what range you’ll probably pay to get the cards scanned. Plenty more factors go into the final price, but if you’re only looking for a high-level price tag, the range above can get you started.
Cost Factors
The two most critical factors that will influence your scanning price are the number of cards and the indexing specs. Along with that are things like OCR text search, timeline, and image file output, which we’ll include along the way.
")
Number Of Cards
Almost to a fault, the first question our people ask when you contact us about aperture card scanning will be “how many cards do you have?”
The number of aperture cards you’re planning to have scanned will have a significant impact on pricing because as the number of cards increases, the unit price decreases (to a limit, of course).
For example, if you have 10,000 cards then your starting price will be on the high side, around $0.75/sheet.
If you have 200,000 cards then you’ll be on the lower end, around $0.25/card.
To be transparent, the price range we gave earlier assumes a healthy amount of cards that we’d be scanning. If you get in touch and let us know you have 150 aperture cards, please don’t expect to pay $0.75/card.
Are you confused about how to figure out how many cards you have? Go to our page “How Much Microfilm And Microfiche Do I Have?” and scroll down to the part that describes aperture cards. You don’t need to know exactly how many cards you have, just an estimate to get started.
Type Of Aperture Card
Aperture cards are all pretty much the same: they look like a long index card made out of sturdy card stock, and they have a gap (an “aperture”) on the right side where the film resides.
Most often the aperture is for 35mm film, but there are variations that will affect the way we scan the cards and the price you’ll pay to have them digitized. The various types are described below, and you can get additional detail and to see some more pictures of the different aperture cards by clicking here to follow this link.
35mm Aperture Card
35mm aperture cards are the most common type of card we scan. They have a single hole (aperture) on the right side of the card and contain one frame, usually a single image of 35mm film. Oftentimes the image is of a large format document, such as an engineering drawing.

35mm aperture card
Though there will only be one frame (one piece of film), 35mm aperture cards can have multiple images within that frame. For instance, when the original microfilm was being created the person taking the photos might have placed four 8.5”x11” sheets next to each other and taken a single photo. In this instance, called “4-up,” there would be four individual documents on a single 35mm image.
If you have a healthy number of “standard” 35mm ap cards (one image per frame), you’re going to be on the lower end of the price scale because it’s a fairly straightforward process. However, if you have multiple images within a frame and want each image separated from the others, your price will start to go up.
16mm Aperture Card
16mm aperture cards aren’t just 35mm cards with smaller images; they’re specifically made for 16mm film strips. These are much less common than the 35mm aperture cards, but they do exist and if you have them it’s important to know why they’re different.
In a 16mm aperture card, you’re likely going to have two “strips” of film inserted into the two apertures on the card. These can be horizontal (more common) or vertical (less common) aperture strips.
Within each of the strips will be 16mm images from top to bottom or left to right. Most of the time the images are “simplex,” which means just one image followed by the next. A less common type of card we’ve seen has a “duplex” setting, which is two images next to each other in a row.
16mm aperture card with horizontal channels
16mm aperture cards with multiple strips per card are more expensive to scan because the images have to be captured with multiple passes of the scanner, as compared to one scan when working with 35mm images. Additionally, 16mm aperture cards will inherently have multiple images per card and those will be framed individually so that when you get your digital file you have a multi-page files; again, compared to one image per file with a 35mm ap card.
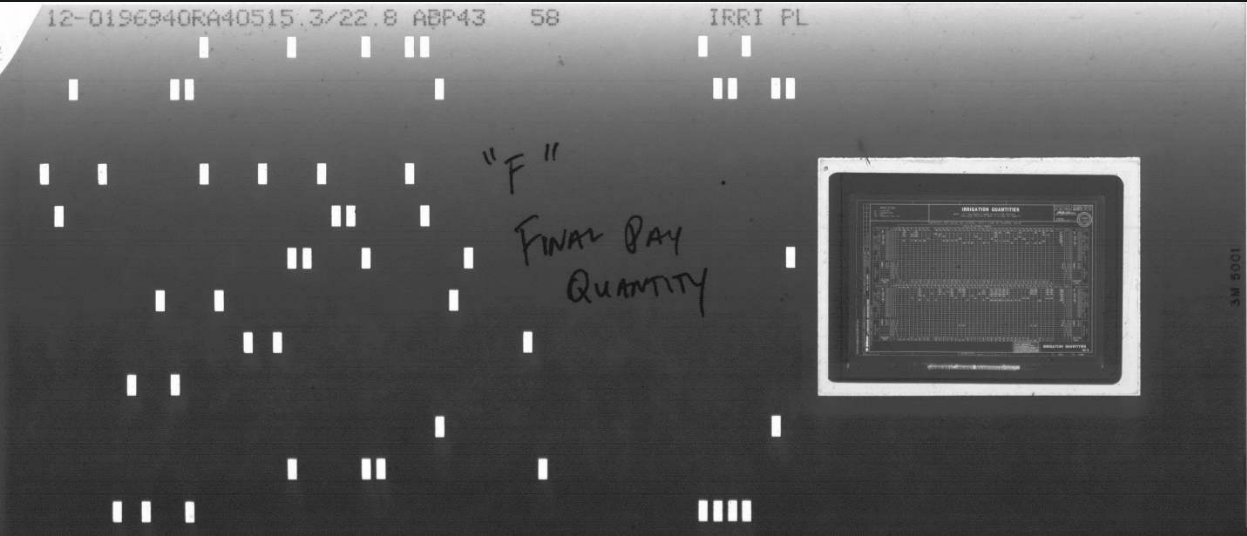
Hollerith Aperture Card
Hollerith aperture cards are those that have the hole punches in the card part of the record (the left side); these correlate to the naming/titling of the record.
Hollerith can be seen in both 35mm and 16mm aperture cards, so it doesn’t change any pricing in the area of image size. What it does affect is the price when it comes to indexing.
Hollerith aperture card. The punch holes make this a”Hollerith” card.
If you have Hollerith aperture cards then theoretically you should be able to run them through specific card scanners that can “read” the Hollerith hole punches and use that information to index and name the record. These might work great or they might not, but if the Hollerith information can be captured then you don’t have to worry about the extra expense of indexing. This makes Hollerith aperture card scanning the least expensive method of digital conversion.
However, if the Hollerith information can’t be captured, then standard indexing methods will have to be used and the price of the scanning will be in-line with standard aperture card scanning prices.
Reduction Ratio
The reduction ratio of the images on your aperture cards is the magnification level that the original records were photographed. It’s the number of times that the image of the original is reduced to fit on the film.
16mm aperture cards will mostly be 24x reduction, which means that if you blew up the image 24 times it’d be back to the normal size of the original.
35mm aperture cards are usually 9x – 17x reduction. Most aperture cards contain large format drawings such as engineering and planning drawings. Because of the size variations of the original material, they have to be captured at different ratios to be able to fit on a 35mm card.
The reduction ratio shouldn’t be a big cost bump. Most of the cards we see are 35mm and have just one image per frame. If you have 16mm cards, you might see a price change if the images are 48x duplex because that’ll increase the number of images in the frame and that costs a bit more to capture.
Image Layout
Image layout is the way that the images are presented on an aperture card.
On a 35mm aperture card, it’s right reading and a single image within the aperture. Unless the film portion of the card is loaded incorrectly, this is how it’s done – you don’t have multiple frames to fiddle with so it’s pretty simple.
On a 16mm aperture card, you can have the images going horizontally (left to right) or vertically (top to bottom) based on the way the strips are cut into the card.
Best case, all the images are positioned correctly and are right reading, but there are some instances where this won’t be true and the images are “out of order.”
Some common image layout obstacles are below, with brief descriptions:
For all of the above scenarios, the issues aren’t necessarily game changes; sometimes the fixes can be easy and fixed with minimal or no cost. Other times, it might be expensive to manipulate the images. A key point to remember is that just because the images aren’t right-reading doesn’t mean you have to fix them – there are ways around this issue by using tools to adjust images on the fly and only when it’s necessary, instead of spending a bunch of money doing everything up front.
Resolution
Resolution is the number of pixels per inch (PPI) that are used to create an image. The term “dots per inch (DPI)” is actually the phrase most often used, although DPI and PPI are not exactly the same things. However, jargon became the norm and digital scanning usually used DPI when talking about resolution.
300dpi is the standard resolution for aperture card scanning, and the majority of conversion projects that we run are scanned at 300dpi.
If you want to have your cards scanned at a resolution other than 300dpi, all you need to do is ask. If you want something higher than 300dpi, expect the conversion price to increase. The higher resolution takes longer to scan and the files become larger (you’re adding more pixels).
Indexing Specifications
Indexing is the way that you want your files named once they’re digitized.
There are three main ways to capture indexing data, in ascending price order:
- From the Hollerith hole punches
- From the title strip
- From the film image
If your cards have Hollerith punch holes, we can “read” the holes using a specific machine and churn out the related data. If the Hollerith was created properly, your digital image will have a logical file name that matches the punch holes on the physical card. Sometimes the Hollerith won’t read, or it was created incorrectly, so you’ll need to use one of the other methods to name your files.
he next method of indexing is capturing the file name info from the card’s title strip, the top portion of the physical card. There are normally various fields with data typed into them, and this can be keyed by a person to create a file name. Occasionally we’ll see cards with handwriting on a random part of the card, but this is the exception.
Lastly, we can index your cards by keying information direction from the film image. This is usually the most expensive way to index because it requires someone to look around the film image(s) to find the piece of data you need. But sometimes it’s necessary because the Hollerith doesn’t read and/or there isn’t any title strip data, so the film image is the only way of naming the digital file.
If you want to read more about indexing, go to our article “The Wild And Wacky World Of Indexing” to continue.
Subcontractors
Subcontractors are companies or workers that are hired to complete a task, usually one that’s part of a larger project.
On certain projects, we may use subcontractors during our scanning process. This does not mean that the entire project goes to them; usually, just a small portion of a project goes to our subs, and we protect your data through various means when we include them on a project.
We don’t work with just anybody – our partners are reviewed, vetted, and tested before we decide to work together, and we have agreements in place with our subs and include them in our internal security audit each year.
Some examples of how we use subs include image framing, indexing, and quality assurance (QA), among others.
If you’re not comfortable having subcontractors work on your project, that’s ok and we can adjust to fit what you like. Just be aware that it’s usually less expensive when subcontracts are allowed than when they’re not.
Project Schedule
The project schedule is the time available from start to finish.

An image of a project “process flow” – all the steps in this particular scanning project.
Schedules vary depending on the scope of work and your team’s timetable. Here’s an example:
You have 50,000 aperture cards (not Hollerith) to be scanned, so you call us to learn more. 50,000 cards would put you in the $0.60/card range, so a total project of about $30,000.
A 50,000 card project going at a good clip will take about 2-4 months total, depending on the initial testing and proof of concept, indexing requirements, and the rate at which you’d like the project to move forward (not every client gives us all of their cards up front; larger projects are usually done in batches).
If you say that you need the project started and completed in under two months, this changes things. We’ll have to prioritize your project, shift around existing commitments and project schedules, and get your project going fast.
With the new timeline, you’re more likely in the $0.75/card range, for a total of $37,500. There’s always more than one piece to a puzzle, but we wanted the example to be simple. Is it worth an additional $7,500 to have the project completed in under two months? That’s up to you to decide.
Not sure how to schedule your project? Read our post about reverse engineering your project to maximize your success.
Capacity
Capacity basically comes down to supply and demand. If we’re loaded with projects it might cost a little more to squeeze in yours if you want it started soon, versus if you’re okay with starting when we have an opening in the schedule.
Our project capacity is always changing, week to week and day to day. To adapt to the changes our project team meets each week to discuss completed projects, work-in-process, and incoming projects. Priorities are confirmed or adjusted; stalled projects are discussed and solutions created; and gaps in inventory are identified and relayed to the sales team to keep the project flow steady.
We try to make your experience smooth so that when you start your aperture card conversion, it gets going and is consistently pushed until completion. When your job starts, we know you want it to be worked on as much as possible and finished quickly – you don’t want us constantly putting other (new) projects ahead of yours. This is the goal for all of our clients and why capacity is a critical factor in pricing if you have an expedited start or end date you’re trying to hit.
OCR
OCR, or Optical Character Recognition, is a process that turns your files into text-searchable documents.
When aperture cards are scanned, the default image file format created is “image-only,” which means that the image isn’t searchable. If you want your electronic files to be searchable, you just ask for OCR and we add it as a step in your project’s process flow.
Although running images through the OCR engine is all “machine time,” it still requires a project manager to properly set up the process and resolve any exceptions that pop up. Adding OCR to your project will normally increase the price a little.
For more details and information about OCR, take a look at our article “What Is OCR?”.
Image & Data Output
To finish out your project, you need to actually receive the digitized images, and to do that you need to choose a delivery format.
The three choices you have are a “traditional” output, our “Digital ReeL” solution, and “your current electronic records application.”
Traditional
A “traditional conversion” is one in which you receive basic file formats such as PDF, TIF, or JPG files.
Most people think of PDFs when they imagine digital files, so it’s just become the “traditional” request when there’s a scanning project.
Digital ReeL
Digital ReeL is our hosted application. The primary use for Digital ReeL is as an archival records management system. The interface replicates your aperture cards so that you can visually verify all images were captured, and you’re able to search for documents using index searches and global text search (if you OCR’d your images).
Pricing-wise, Digital ReeL is about the same as a traditional scanning project. The difference is that there’s a hosting fee (either annually or monthly) once the scanning is complete, and for what you get (hosted application, backup copy of your records, and secure access) the price is quite enticing.
Your current electronic records application
If you already have an electronic database of records, you might not want to purchase a new one (such as Digital ReeL) or just get basic PDF or TIF files on a USB drive. You’ll probably want to import the digitized images into your existing system so that you can have a single access point for your legacy, current, and future records.
If you’re importing to an existing application you’re probably still going to want PDF, TIF, or JPG files. But the last piece of the puzzle is that you’ll want them formatted for import and auto-population into your system. So it’s kind of like a traditional conversion 2.0.
What your project will cost you will depend on the complexity of your system and the fields required to import the images and data once they’re scanned. The more complex, generally the higher the fee.
Conclusion
How much does aperture card scanning cost?
It depends!
Next Steps
Reach out to us today! Click the “Get Your Quote” button below, fill out the form, and we’ll quickly reply to you to discuss your project.
Further Reading
Here are additional articles related to digital conversion that you’ll find useful:
‘How To Choose The Right Microfilm Scanning Partner” provides you with our insights into how to select the right scanning partner for you. And yes, we might not be the right fit.
“How Much Does Microfilm Scanning Cost?” is the sibling article that covers microfilm scanning costs. If you have microfilm, check out this article for examples and specifics.
“How Much Does Microfiche Scanning Cost?” gives the details about microfiche scanning – if you have microfiche sheets in addition to your aperture cards, this provides pricing ranges for you to use as you create your project budget.
“Quality Assurance & Digital Conversion” is an overview of a somewhat hidden part of digital projects, the quality checking part. There are many ways to peel the orange here, so having an idea of what works best for you will help guide your decisions when you start your project.