
Are you wondering how much it’ll cost you to have your sheets of microfiche scanned and converted to digital? If you’re looking around the internet trying to find out information about microfiche and companies that can scan this type of record, we’re assuming that the price is probably something you’re very interested in.
We’ll be up front with you: without knowing the details of your project and being able to speak with you and ask you questions, we can’t give you an exact price. What we can give you is an overview of the rates you’re likely to see if you’re looking for microfiche scanning, and some of the factors that go into developing the price.
Another of our pages, How Much Does Microfilm Digitization Cost?, provides you with high-level scanning fees for the three major microform types (microfilm, microfiche, and aperture cards). In this post we’ll specifically cover microfiche so that you have a deeper understanding of what can affect your scanning price and how you can craft your project requirements to fit your needs and your budget.
General Microfiche Scanning Price
The general price range you can use for fiche scanning is below:
$0.75 – $1.25/sheet for jacket fiche (16mm and 35mm)
$1.25 – $3/sheet for Step & Repeat fiche
$3 – $5/sheet for COM fiche
The three types of microfiche above – jacket, step & repeat, and COM – are the most common types we see in when it comes to scanning into digital. There are a few other types of fiche that we’ll occasionally scan, but because they’re rarer we’ll just focus on these three.
If you have a cabinet full of microfiche sheets and you just want a high-level idea of what it might cost you to get them scanned, the pricing here gives you a starting point. To see the other factors that go into coming up with a refined scanning fee, keep on reading.
Cost Factors
The general microfiche scanning rates are a perfect place to start if you just want a ballpark idea of what a project could run you. If you think you’re in the range to have your fiche scanned based on that ballpark, it’d make sense to understand the other factors that contribute to coming up with your final scanning price. These other factors include the number of fiche sheets, the type of microfiche, resolution, your indexing requirements, project timing and schedules, and more.
We’ll take a look at each item and see how it contributes to the final scanning price.
")
Number of Sheets
When we get contacted about microfiche scanning, our first question is normally “can you tell me how many sheets of microfiche you have?”
The number of microfiche sheets that are a part of your project is one of the most important factors for creating a scanning price because larger amounts of fiche usually get you lower unit pricing. There are exceptions, of course, but like most bulk purchases it makes sense that when you have more of something, the price per individual unit will be lower. Same goes for microfiche scanning.
For example, if you call us and say you have 5,000 sheets of jacket fiche, your starting price will be on the higher side, around $1.25/sheet.
If you call and say you have 150,000 jacket fiche then you’ll start on the lower end, around $0.85/sheet.
You may be thinking, “okay! I’ve got 30,000 sheets of jacket fiche so my price per sheet is about $1.00. That means my total project cost will be $30,000. And I’ve got the budget, let’s go!”
Good job extrapolating the price for your particular number of fiche because you’re partly right. When you came up with the $1.00/sheet price, that’s pretty good. We’d probably say the same thing if you had called and asked us, so nice work with the estimate. What comes after that initial estimate is the adjusting and tweaking to see what the final price will be. The next few sections will cover this in detail.
An important note: if you have a small number of sheets (a couple hundred at most), counting them and figuring out how many you have isn’t too difficult. When you get to 300+ sheets it gets harder to come up with an exact number, so we put together an article that can help you come up with your count. Go to our page “How Much Microfilm And Microfiche Do I Have?” and scroll down to the part that describes microfiche.
You don’t need to know exactly how many fiche you have, just have an estimate that’s decently accurate. Honestly, with the thousands of fiche scanning projects we’ve done over the decades, rarely is anyone ever spot on with the number of sheets they have.
Type of Microfiche
Microfiche comes in various forms, and because each one requires a different method of scanning and processing it’s critical to understand which type of fiche you have so that you’re able to get an accurate price quote. We’ll describe the most common types below, but you can get additional detail and to see some more pictures of the different microfiche by clicking here to follow this link.
Jacket Microfiche
Jacket microfiche are made of sleeves, also called “channels,” that hold strips of film. These microfiche are created by cutting up rolls of microfilm and inserting the strips into the sleeves of the fiche. The size of a sheet of jacket fiche is typically 4” x 6”.
16mm jacket microfiche has five channels available in which to insert film, with a title strip at the top of the jacket. Not all of the channels must contain images, though. We often see 16mm jacket fiche with just a strip or two of film. Also, you can add smaller chunks of film to the channels, such as a strip of two images, three images, even just one image. The film doesn’t have to be one contiguous strip. Jacket fiche normally holds up to 12 images per channel, so a total of up to 60 images per sheet.
35mm jacket microfiche has two channels available in which to insert film, with a title strip at the top of the jacket. LIke the 16mm fiche, not all channels must contain images and each channel can have images from various film sources. These fiche normally contain six images per fiche; having fewer is normal, but since these already hold so few images it’s common to find them full.
Jacket microfiche is the most common type of fiche that our customers have, and is normally the least expensive to scan of the various formats. Because the number of channels to scan and images able to be stored on a jacket fiche are relatively lower, scan-for-scan jacket fiche is the least costly coming in around $0.75 – $1.25/sheet.

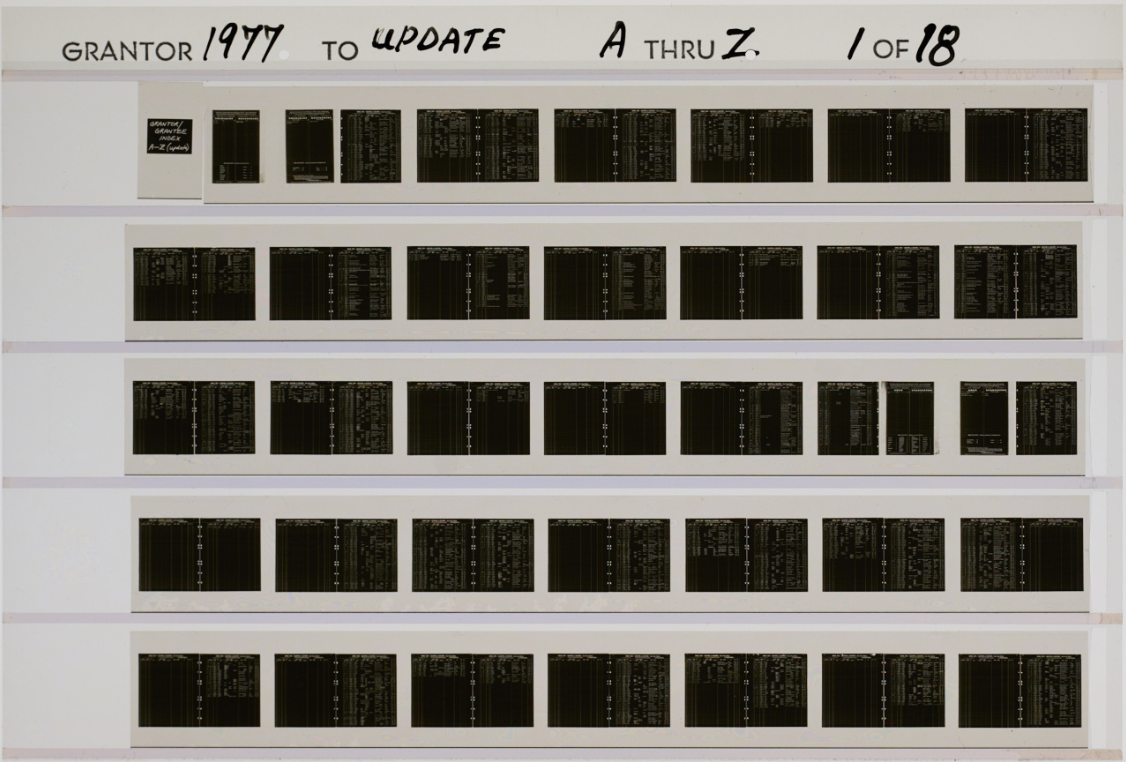
Step & Repeat Microfiche
Step and repeat microfiche isn’t as common as jacket or COM fiche, but we see it enough that it warrants a mention here. These fiche are filmed on a special overhead camera that photographs the image of the original hard copy directly onto the microfiche sheet, compared to creating a roll of microfilm and then cutting images and inserting them into jackets. Most step and repeat fiche will have up to 96 images per sheet.
Step & repeat fiche are generally right in the middle of the price ranges – there are more channels and images to scan than on a jacket fiche, but much fewer than on a COM fiche. The fees lean closer to jacket fiche because of the similarities between the two types, though it’s a bit higher at something in the $1.25 – $3/sheet range.
COM Microfiche
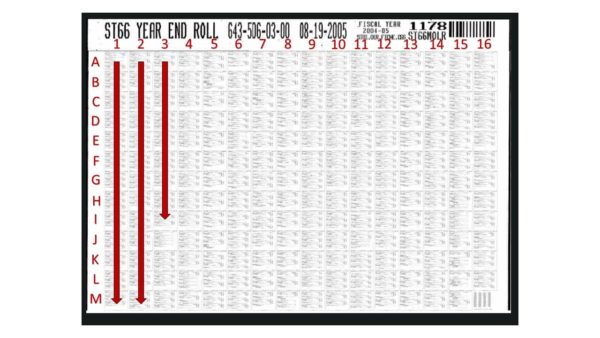
COM microfiche comes in sheets with a grid pattern of images that is cleaner than jacket fiche. COM stands for “Computer Output Microfilm” because the microfiche was generated from digital images and printed on microfiche instead of paper. On typical COM fiche you’ll find up to 300 images. In most cases, there is an index page at the bottom right of the fiche sheet which gives you the frame locations of specific content on that fiche.
COM microfiche is normally priced higher than the other types because there are so many channels and images to scan. If you compare a jacket fiche to a COM fiche, you’re scanning about 5x the number of images on COM. That means more scanning and more processing of images, and you’ll be paying around $3 – $5/sheet for COM.
Reduction Ratio
Reduction ratio is the magnification level in which the original records were photographed. In other words, it’s the number of times that the image of the original record is reduced to fit on the microfiche. The technically correct term is “optical” reduction ratio because the image is reduced optically (the naked eye) and not digitally. It’s a replica of the original, just smaller.
16mm jacket microfiche normally comes in a 24x reduction ratio, which means that if you enlarged a single image on the microfiche, it’d be back to the normal size of the original document.
35mm jacket microfiche normally is seen in a 9x – 17x reduction ratio. The range of reduction ratio on 35mm fiche is because there’s a wider variety of material sizes that get captured: for example, oversize books, newspapers, and large format engineering drawings. Because of the size variations of the original material, they have to be captured at different reduction ratios to be able to fit on a 35mm jacket fiche.
COM fiche typically comes in a 42x reduction ratio, but you might also see some 48x COM fiche. These images are much smaller than what you’d find on a 16mm jacket fiche because they were created from digital images and are computer-generated, making the precision of the image placement greater than just cutting up some film and loading into jackets.
Step & repeat fiche generally comes in either a 24x or 48x reduction ratio.
Overall, the reduction ratio of your microfiche probably won’t affect your scanning price because even though you might be able to squeeze a few more images on a sheet with a higher reduction ratio, it’s not going to be too many more. The most likely case where your price could see a bump up is with the 48x step and repeat fiche, because you could almost be doubling the number of images from a 24x sheet.
Image Layout
The image layout is the way in which the images are presented on a sheet of microfiche. On jacket fiche, for example, the standard image layout is right-reading, top to bottom. If the images on a sheet of jacket fiche were one entire document, you’d start with the image on the left in the first channel, read to the right, then start on the left of the second channel, and so on. Think of it like reading a book, you read left to right and top to bottom.
Note that most image layout issues occur on jacket microfiche because these fiche are created by loading chunks of microfilm into the channels. When someone is loading the fiche, they may load the images incorrectly or just do a poor job of it, and that’s why these layout issues occur. You’re not going to see the issues below on COM fiche and likely not on step-and-repeat fiche, either.
Some common image layout obstacles we run across include the following:
Like what was mentioned in the example above, right reading images are set up as if you’re reading a book: you start at the top channel in the fiche and read from left to right, then you go down to the next channel, repeat, and so on. Something you might notice on your fiche is that the images might be turned in some fashion so that they’re not right reading.
They could still be in the correct order overall (page 1 through 60 on a jacket fiche are in order), but if you make a PDF out of the fiche then some of the images might be rotated like they appear on the physical record.
This issue isn’t too terrible, as the fix might be as simple as having a bit of code identify which images aren’t right reading and rotate them to the proper position. Your price likely won’t change just because of some rotated images. However, code and algorithms don’t always work 100% perfectly, and if manual rotation is necessary then you could see a little bump in price.
Mirrored images are basically flipped so that you’re seeing the reverse, or “mirror,” image of the original. Take your left hand and hold it out and arm’s length in front of you with your palm facing away from your body. Let’s pretend that’s a fiche image that’s right reading and correctly positioned. Now turn your hand so that your palm is facing you. That’s a mirrored image.
Mirrored images can also be fixed using certain processing technology, and if an entire fiche is mirrored then it’s pretty simple. The hard part is when only certain channels or certain images are mirrored because then we can’t apply un-mirroring technology to the entire fiche. Instead, we’ll have to search for and identify the individual images or channels and fix them in a more piecemeal way.
When the technology to un-mirror images can’t be applied to entire fiche sheets, you’ll probably see an additional charge to fix the issue.
Your fiche might have a few individual images that were loaded upside down; this is again probably due to operator error and whomever loaded the images into the fiche made a mistake.
When individual images are upside down, they might be able to be identified after scanning and during the processing phases of a digital conversion. If they’re identified, they can be rotated manually to be right-reading. This is a labor-intensive way to rotate images, and can have a decent price tag on it because it requires two steps: identification and rotation. The harder of the two is the identification!
Taking the “upside down individual images” to the extreme is having entire channels on your microfiche upside down. When jacket microfiche is created, strips of microfilm are cut into chunks and loaded into the microfiche sleeves. If someone loads an entire strip of film into a microfiche jacket and it’s loaded upside down, that’s what we’re talking about.
Interestingly, if all of the channels in your jacket fiche are upside down, it can be simple to fix using coding and technology to just flip everything right-side up. The trouble comes when not all of the channels are going the same direction and instead of being able to rotate all of the images on the fiche, you now have to identify only the ones that are upside down. It sounds easier than it is because the upside down channels probably aren’t consistent across each fiche sheet.
In a nutshell, if you have upside down channels and want the images rotated, you’ll be spending a little more money than if all the channels were correctly oriented.
It’s just getting ridiculous at this point. Yes, we’ve seen fiche that are upside down and mirrored and it’s almost laughable because it’s so crazy. Why someone would load fiche like this is beyond us, but it happens.
Based on the three previous snippets (mirrored images, upside down individual images, and upside down channels), you can probably guess that having upside down and mirrored images is going to cost more money to have fixed than if your fiche were clean and right-reading across the board. You’re correct.
The tricky part about all of this is that most of the time we can’t automatically identify which images need rotating or mirroring. Inconsistency kills the chance to quickly adjust your images using coding and auto-detection, so most of the time a person will have to slog through all of your images (potentially hundreds of thousands) to find the few that need fixing. This takes time and time costs money, so prices will increase if you want all of your images right reading.
Remember, you don’t have to have them adjusted to be right reading, it’s a choice…
Truthfully, the framing order of your microfiche images isn’t likely going to affect the scanning price. In almost every case, the framing order is as follows:
Jacket fiche: left to right, top to bottom
Step & Repeat fiche: left to right, top to bottom
COM fiche: top to bottom, left to right
To elaborate, when we scan jacket fiche and frame the images, the sequence of the images starts on the top row and goes left to right (image 1, image 2 … image 12) until the end of the row. Then we bump down to row 2 and continue left to right (image 13, image 14, etc.).
COM fiche is different in that it starts on the leftmost column and the image count goes from top to bottom, and then right to left.
Unless you have some really weird fiche where the framing order needs to be changed, this shouldn’t even be a factor in figuring out the cost of your scanning project. However, it can happen if you have mirrored fiche like we described in the previous section. In cases like that, we might re-order the framing sequence to account for the mirrored images and channels, and that could require some custom coding and potentially an additional cost.
Standard COM fiche framing order: top to bottom, left to right.
Any special request might come with a price increase; it’s outside of the norm and therefore “special.”
An example of a special request that we’ve received is to scan our client’s fiche, create a multi-page PDF per fiche sheet, and index the file by the title strip. Easy start.
The twist was that our client wanted the last image of the fiche to be positioned as the first image of the PDF, which required additional processes to accomplish. Also, they requested that we index the fiche by first keying a street name found on the title strip (easy) and then looking at a specific image within the fiche to capture the last street name listed on the image, then create a street name range combined with the info from the title strip (not as easy). We were happy to do this and the project was successful, but the complexity of the special request required a little bump in price.
Number of Images
Our standard method is to scan the entire microfiche sheet, regardless of the number images. This is to ensure complete capture of all images and, in the case of Digital ReeL, to capture the entire physical sheet. In general, the number of images on your fiche won’t be a factor in pricing – the type of fiche takes care of that already.
Here’s the reason: even if you have microfiche sheets that are half full – such as a jacket fiche with 30 instead of the full 60 images – the scanning time really isn’t much less than if we’re scanning a full fiche. Plus, it’s nearly impossible to accurately describe how many actual images are contained in your fiche collection.
Let’s imagine you have 30,000 or so jacket fiche. First, counting the exact number of microfiche sheets is in itself difficult and time-consuming. So right away you’re using an estimated number of sheets. Next, if you assume that your fiche are generally half full (~30 images per sheet), you’re saying that you probably have about 900,000 images. If a vendor tells you the per image price is $0.035/image, that’s an estimated project price of $31,500. In actuality, here’s what can happen:
Scenario 1
Your actual # of images is 25% lower than estimated, 675,000 images
675,000 images x $0.035/image = $23,625 project price
You win! Your cost is lower than planned.
Scenario 2
Your actual # of images is exactly as estimated, 900,000 images
900,000 images x $0.035/image = $31,500 project price
You win! Your cost is exactly what you planned for.
Scenario 3
Your actual # of images is 25% higher than estimated, 1,125,000 images
1,125,000 images x $0.035/image = $39,375 project price
You lose! Your cost is higher than what you planned for.
Will an additional $8,000 break the bank if you counted wrong? Maybe not, but if the project was larger (50,000+ fiche) you can see how the poor image counting can become a problem and get out of hand pretty quickly.
Instead of all this, why not just get a price per microfiche sheet? You still won’t have an exact count (it’s hard to count 30,000 sheets of fiche), but even if you’re off by a little bit, the price will be more solid. So if you have a price of $0.90/fiche, your project price will be $27,000. Even if you’re off by 5% on your count (and you have 31,500 fiche), it’s just a slight bump to the overall cost, regardless of the number of images.
Resolution
Resolution is the number of pixels per inch (PPI) that will be used to create an image. Although the correct phrase is “pixels per inch (PPI),” the term “dots per inch (DPI)” is the common way of describing resolution because DPI came from photography before pixels were used in digital imagery.
300dpi is the standard of the digital scanning world, and the majority of microfiche conversion projects that we do are scanned at 300dpi.
Though 300dpi is the standard, you can ask for any resolution you want – it’d be a request out of the ordinary and we’d ask you a few questions about the specifics of your request, but if you must have a different resolution then that’s okay.
If you decide to have your fiche scanned at a resolution higher than 300dpi, expect the conversion price to increase. Increased resolution means the scanning takes longer (additional pixels necessary to create the images) and the files become larger (you’re adding more pixels). Since the scanning is slower, it takes longer to do the same amount of work that’d be required of 300dpi scanning, and that means a rate increase to compensate for the extra work.
Indexing Specs
The term “indexing” is also known as “keying,” “cataloguing,” “naming,” and “organizing.” They all mean the same thing: once your microfiche is scanned and digitized, it’s how you want us to name the files so you can find them later.
In addition to the number of fiche sheets you have for your project, indexing is usually the next most critical piece of your scanning project because of the influence it has on complexity and pricing.
If you’re curious and want to read more in-depth about indexing, head to our article “The Wild And Wacky World Of Indexing” to dive in.
For our example, we’ll say you work at a building department and you have 80,000 16mm and 35mm jacket microfiche sheets. On the fiche are permit documents (the 16mm fiche) and plan set drawings (the 35mm fiche). You’re looking to convert the fiche into digital images and load them into your current records database (this could be OnBase, Laserfiche, etc.). When we ask how your files are organized in the database, you say that depending on the records it’s by the Address (Street # and Street Name) and the Permit Number, and that most of the time your staff finds what they need by looking up the address.
First, we’ll start with just the scanning – for 80,000 jacket fiche you’re looking at something in the $0.90/fiche range. Now the project benchmark will be around $72,000 or so.
Next comes the indexing. Permits can be a few pages or they can include dozens of pages depending on the work being done. When it comes to permits on fiche, we’ll usually see a Street Address and a Permit Number on the title strip, and then any associated records as images in that fiche. This is the most common method of organizing permits on fiche so that if you’re looking for a permit, you can easily find it. If there are more pages than can fit on one sheet of fiche, we’ll usually see the other sheets named exactly the same as the first fiche but with a “fiche of fiche” (“2 of 5,” “3 of 5”) identifier so you know that there are multiple sheets that all belong to the same permit.
Sticking to “title strip indexing,” which is just naming files after the information that’s on the microfiche title, a simple output is multi-page PDF files per microfiche sheet and named by the fiche title. For every sheet of microfiche you have scanned, you’ll get a digital file, in this case 80,000 of them. This is the simplest method to index because a) identifying a file is easy since the physical sheet will indicate a file, and b) you’re replicating how you already find your fiche.
Next in complexity would be combining images into one file after they’ve been scanned so that fiche with matching index data can be kept as a single document. This can be a bit tricky, since the method of combining files is based on the information on the fiche title strip. If it’s not exactly the same as the other title strip, a human will have to determine which files should be combined – involve humans and there’s more chance for error.
Example 1
Two fiche have “123 Cherry Ave. #890013” on their title strip. That’s the address and the permit number. At the end of the project, we’d have two files named the exact same way, so they’d be merged into one single file.
Example 2
One fiche has “123 Cherry Ave. #890013” on the title strip, another fiche has “123 Cherry Avenue 890013” on the title strip. At first glance they look the same, but you’ll notice that one fiche has “Ave.” while the other has “Avenue,” and one of the permit numbers doesn’t have the hashtag “#” included. These might seem like small inconsistencies, but when you have tens of thousands of fiche and are trying to merge multiple PDF records into single files, it’s a problem. From our position, these are different fiche since they’re titled differently. If you want them merged, you’ll need to tell us how each variation of a title should read, and then we can adjudicate discrepancies as we find them in order to merge the fiche sets.
We have seen times where multiple permits are combined on fiche under the same address. This makes finding specific permits difficult since they’re not separated on different fiche sheets. To index individual documents that aren’t identified by physical separation (aka on separate fiche sheets), you have to look at every single image and figure out which belong to specific records. With 80,000 fiche in your project, and even at 50% full fiche that’s 30 images per sheet, that’s 2,400,000 images. Two … point … four … MILLION … images. And you want us to look through every single one to figure out which belong to different permits and plan sets? Very expensive!
If you can stick with fiche-title indexing and creating one digital file per microfiche sheet, that’s the most cost-effective way to index your records. In the end, you need what you need and we can figure out any method of indexing required, but if you’re looking to keep project costs reasonable then we recommend title strip indexing.
Plus, title strip indexing is how you already find your records now!! Do you really need to complicate it any more?

Title strip vs. image-level indexing: one capture point is much easier (and less expensive) than 270 pages!
Subcontractors
Subcontractors are companies or workers that are hired to complete a task, usually one that’s part of a larger project.
Simple enough, but the term “subcontractor” usually comes with some baggage when you’re hiring out a project because you’re wondering “where’s my stuff going?” We know where you’re coming from and understand the concern. Using subs for specific parts of a project allows companies (including us) to lower our costs, which means lower prices for you!
If the price of your project, with some subcontracted work, is $30,000 but then you decide that you don’t want to allow subcontractors, the new price could go up significantly, even sometimes doubling.
We can’t speak for every scanning and digitization company, but we’re pretty confident that most use subcontractors for various activities in their projects. It makes sense because to keep costs down it’s sometimes more viable to use another agency instead of your own employees.
You know, even we (the good ol’ folks at BMI) are hired as subcontractors for projects by other digital imaging companies. They might not have the ability to do a specific type of task as part of a project, such as microfiche scanning, so they hire us to help out.
We use subcontractors at various stages in our scanning processes, and only on certain projects. We don’t work with just anybody – our partners are reviewed, vetted, and tested before we decide to work together, and we have agreements in place with our subs and include them in our internal security audit each year. Also, just because we might be using a sub on a project does not mean that the entire project goes to them. Usually, just a very small portion of the project goes to our subs, and we protect your data through various means when we include them on a project.
Some examples of how we use subs include:
Image Framing
Checking low-resolution, illegible images to “frame” the images so that the data is captured and can be converted into a PDF or TIF, and to ensure the images are selectable in Digital ReeL.
Indexing and Data Entry
Capturing data fields to index and name the digital files. This might include the entire indexing spec or just a part of it.
Document Identification
Looking through images to identify certain features, such as a flasher at the beginning of a file or a stamp that indicates a specific record.
Quality Assurance & Quality Control (QA/QC)
We do many of these processes using our own employees and technology, but we might still use a subcontractor to check our work or a percentage of it. In this way having subs check our work helps minimize mistakes and errors on our fiche scanning projects. Take a look at our QA article to learn more about this topic.
If you’re not comfortable having subcontractors work on your project, no problem. Just be aware that it’s usually less expensive when subcontractors are allowed than when they’re not.
Project Schedule
The project schedule is the amount of time between the start of the project and when it’s completed.
Schedules can vary wildly depending on the specific project and what you need to get done and by when, so an example should help provide some idea about what we mean:
You have 80,000 sheets of 16mm jacket microfiche that you want to get scanned, so you ask us the price. At 80,000 fiche sheets, you’re in the $0.85/fiche range, which puts you at a $68,000 estimate.
When we give you this estimate we’re usually thinking that the project isn’t a rush and we’re on a “standard” scanning schedule. An 80,000 jacket fiche project will take about 3-4 months depending on the initial testing and proof of concept, indexing requirements, and the rate at which you’d like the project to move forward (not every client gives us all of their microfiche up front; larger projects are usually done in batches).
If you tell us that you need the project started and completed in under two months, this changes things. We’ll have to prioritize your project, shift around other existing commitments and project schedules, and get your project going fast.
With the new timeline you’re more likely in the $1.00/fiche area, for a total of $80,000. There’s always more than one piece to a puzzle, but we wanted the example to be simple. Is it worth an additional $12,000 to have the project done in half the time? That’s up to you to decide.
Not sure how to schedule your project? Read our post about reverse engineering your project to maximize your success.

An image of a project “process flow” – all the steps in this particular scanning project.
If this was your project and you asked it to be completed in half the time as is usually required, you can see why it might cost more.
Capacity
It’d be great to have a consistent project schedule that’s easy to predict, but our project capacity is always changing, week to week and day to day. To adapt to the constant change, our project and operational leaders meet each week to discuss completed projects, work-in-process, and incoming projects. Priorities are confirmed or adjusted; stalled projects are discussed and solutions created; and gaps in inventory are identified and relayed to the sales team to keep the project flow steady.
How does our capacity affect your price? In short, supply and demand. If we’re strapped down with current projects and have a bunch lined up ready to begin, we don’t necessarily need an additional project at this moment in time.
It’s not that we don’t want another project, it’s just a matter of timing. If we’re full up and you need your project started immediately, there might be a slight uptick in the price to accommodate the internal changes we’d have to make to move other projects out of the way. If you’re okay with holding off on starting your project until we get through some of our current commitments, that gives us some breathing room to make adjustments based on workload.
On the other hand, if you contact us for microfiche scanning and we’re at a stage where we don’t have many microfiche projects in house or on the way, you could even get a slightly lower price than normal. Idle scanners don’t do anyone any good, so it might make sense to give you an incentive to start your project more quickly than you had planned.
It’s like buying skiing clothes: if you buy them in summer, you’re probably going to spend less than if you bought the same clothes in winter.
OCR
If you want to be able to search for words and phrases on your digital images, then you want OCR text search. OCR, or Optical Character Recognition, turns “image-only” files into searchable data. For more specifics about OCR, take a look at our article.
When microfiche is scanned, the default image file format created is “image-only,” which means that the image isn’t searchable. The text is just an image. Once you say you want searchable data, that triggers the OCR process.
When OCR is requested, we add a step to the project process flow: the scanned images are ingested into our OCR engines and turned into searchable files.
Since the process is done “automatically” by computers you might think that it’s “free,” but that’s not the case. There are always limits to technology, and although a human isn’t doing the OCR manually, we only have so many OCR engines to process images. With that, there may be an increase in your project price to add OCR and create searchable files.
IMAGE
Image & Data Output
Once your microfiche is scanned, you’ll have to choose how you want to access the digital images: you’ll need to choose the image file format and the data output method. The three main options you’re able to choose from are a “traditional” output, the “Digital ReeL” cradle-to-grave solution, and “your current electronic records application.”
Traditional
When it comes to microfiche digitization, a “traditional conversion” is one in which you receive standard PDF, TIF, or JPG files at the end of the project.
This is what the majority of people think all microfiche scanning projects are, and we’re not going to fight it or try to change your mind; that’s why we call it traditional! Getting a request for PDFs is common for first conversations because we’re all so used to using PDFs in our daily lives.
When we run a traditional microfiche conversion project for a client, we’ll normally deliver the files (PDF, TIF, JPG) in one of two ways:
- Multi-page files indexed by microfiche sheet
Each fiche sheet will be converted into a multi-page file and we’ll name it by the fiche title strip. For example, if you’re scanning 16mm jacket fiche you’ll see a file such as “Fiche 231.PDF” and when you open that file, it’ll be a 60-page PDF.
- Single-page files in fiche-level folders
Each fiche will be converted to a digital “folder” with single-page files named sequentially in that folder. Imagine a Windows-style folder named by the fiche title strip (“Fiche 231”) with images in that folder named 001.PDF, 002.PDF … 060.PDF.
Digital ReeL
Digital ReeL is a hosted application that is ideal for microfiche records. The primary use for Digital ReeL is as an archival records management system. The interface virtually replicates your microfiche sheets so that you can visually verify all images were captured, and you’re able to search for documents using index searches and global text search (if you OCR’d your docs).
Digital ReeL is an application we created, and we include it here because it’s distinct from the other two options (traditional output and importing into your current records database).
When it comes to fees and pricing, Digital ReeL is actually about the same as a traditional scanning project. Because it’s an in-house application, we control the environment and can keep costs down, instead of being a middle-man selling another product. And if our costs stay down, yours do, too.
Your current electronic records application
If you already have an electronic database of records, you might not want to purchase a new one (such as Digital ReeL) or just get some PDF or TIF files on a USB drive. You’ll probably want to import the newly digitized images into your existing system so that you can have a single access point for your legacy, current, and future records.
If you’re importing to an existing application you’re probably still going to want PDF, TIF, or JPG files. But the last piece of the puzzle is that you’ll want them formatted for import and auto-population into your system. So it’s kind of like a traditional conversion 2.0.
What your project will cost you will depend on the complexity of your system and the fields required to import the images and data once they’re scanned. The more complex, generally the higher the fee.
Conclusion
It’s time to answer your question:
How much does microfiche scanning cost?
The answer?
It depends!
Next Steps
Reach out to us today! Click the “Get Your Quote” button below, fill out the form, and we’ll quickly reply to you to discuss your project.
Further Reading
Now that you know what goes into microfiche scanning prices, below are some other articles about scanning and digital conversion that can help you understand other parts of the process.
“The BMI Microfiche Scanning Process” illustrates our 11-step method to take your fiche records from hard copy to digital. Steps include transportation, proof of concept testing, and post-scan image processing.
“3 Mistakes That Can Derail Your Microfiche Scanning Project” describes common mistakes that happen during microfiche scanning projects. Avoid these and you’ll have a successful project!
“How Much Does Microfilm Scanning Cost?” is the sibling article that covers microfilm scanning costs. If you have microfilm, check out this article for examples and specifics.
“How Much Does Aperture Card Scanning Cost?” is another post about scanning costs, this one specifically about aperture cards.