
Are you asking yourself “is my microfilm deteriorating?” If your answer is “yes” then you’ve found your starting place to:
- determine if your microfilm and microfiche records are in fact in the process of decay.
- understand how you can protect your records and begin the preservation of your collections.
- mitigate the risk of deterioration with proper records management.
If you’re not asking yourself about the condition of your microfilm and microfiche collections, that’s okay, too. The good news is that because you’re reading about the preservation of microfilmed records before they start to deteriorate, you’re ahead of the game and will be in a better position to know what to do when the time comes.
How Can I Tell If My Microfilm Is Deteriorating?
The unfortunate thing about this question is that by the time you find out your film and fiche collections are deteriorating, they’re already going bad! We don’t have a solution for you like the “Best By” date you’d find on a gallon of milk (although even those can be suspect). There are some general guidelines about the lifetime range for microfilm (100 to 500 years depending on the type of film), so that’s a place to start, but once you get into the specifics about how you organize and maintain your microfilm storage facilities (temperature and humidity, for instance) and the way in which your staff or your patrons handle the film and fiche, how long your archives last will start to fluctuate.
That in mind, we’re providing you a handful of ways in which to tell if your microfilm is starting to go bad so that you can catch the issue as early as possible and either staunch the decay or find a solution to preserve your content before it’s permanently destroyed.
Top 3 Signs That Your Microfilm Is Going Bad And What To Do About It
My Microfilm Smells Like Vinegar
“Vinegar Syndrome”
Just like it sounds, vinegar syndrome is a malady that affects your microfilm records and makes them smell like … vinegar! The acetate chemicals in the film break down and turn into acetic acid, which is also present in vinegar and gives it its distinct aroma.
If you have acetate-based microfilm, your records are susceptible to deterioration if not kept in proper storage conditions. You may notice a slightly sour smell which indicates the process of deterioration has begun, and is a precursor to the full-blown aroma of vinegar. If you think that your microfilm has a sour scent to it, a simple test is to take a reel out of its container and smell near the center of the roll. In most instances the smell will be more pronounced within the center of the roll, so if you think you caught a whiff of something, this may help you find out quickly without having to do any formal testing.
Not sure if you have cellulose acetate-based film? Take a look at the Northeast Document Conservation Center’s overview of film bases to check. Here are some ways to check if you have acetate-based film:
- The word “Safety” is printed on the border of the film strips. Acetate-based film was dubbed “Safety Film.”
- Your film has a sour or vinegar smell (finding out this way isn’t fun!).
- Testing using acid-detection strips (A-D strips).
- Your microfilm was created prior to the mid-1980s (not necessarily an identifier, but puts your film in the range that could be acetate-based).
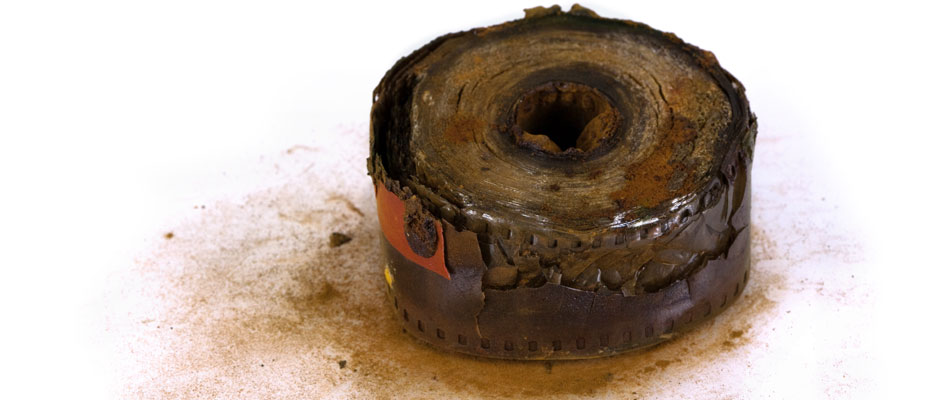
Once the process of deterioration begins, it cannot be stopped; even more exciting, once the deterioration has begun, the products created from the degradation actually induce further deterioration! That’s a mouthful, but basically what it’s saying is that it’s a cycle of destruction. And microfilm that’s affected by vinegar syndrome can infect your other film records, so quarantine them as soon as you notice the issue to prevent a mass outbreak of this disease.

Vinegar syndrome affects cellulose acetate-based film, which was prevalent mostly before the mid-1980s. Most microfilm processed after the mid-1980s uses a polyester-based film not subject to vinegar syndrome.
If afflicted with vinegar syndrome, your microfilm and microfiche with follow certain phases of deterioration as the issue becomes more severe. Below is an excerpt from the Wikipedia article on Cellulose Acetate Film that describes this process:
Progression of Degradation
- Acetate base deteriorates, and when it diffuses to the surface you get the characteristic vinegar smell.
- The plastic that forms the base of the film becomes brittle.
- The film begins to shrink.
- The emulsion and the film base separate, causing “buckling” or “channeling,” the latter term used by archivists.
- Bubbles appear on the emulsion, caused by additives no longer being compatible with the plastic base and oozing to the surface. This is a sign of advanced degradation.
- Pink or blue colors may appear in some film, due to anti-halation dyes.
- If you think your film has vinegar syndrome, you can test for it using acid detection strips (A-D strips).
- If you detect vinegar syndrome on any of your microfilm collection, quarantine the affected film from the rest of the collection. This disease can spread, and as much as possible you want to reduce the risk of other microfiche and microfilm records becoming exposed and affected.
- Create duplicate copies of the microfilm on polyester-based film (almost all film today is made with a polyester-base and is immune to vinegar syndrome). Making duplicates won’t fix any flaws on the film affected by the vinegar syndrome, but it will capture the records as they currently exist, halting further loss of the content.
- Scan and convert your microfilm into a digital archive. This will alleviate the issue of film degradation, and will also allow you to dispose of the affected rolls, even all the rolls if you decide. A microfilm scanning project can be straightforward and easier than you might expect; check out our infographic to see how simple it can be to get your microfilm scanned and digitally preserved!
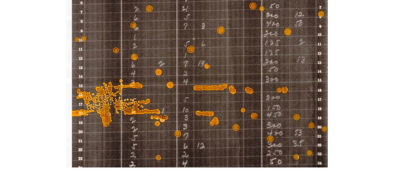
My Microfilm Has Orange Spots On It
“Redox”

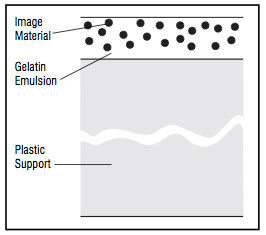
Redox is caused by the local oxidation of silver (silver was used in microfilm creation for many years) that creates formations of yellow/red/orange spots on your microfilm. Exposure to moisture, air, and contaminants causes the silver image to corrode. For a more detailed description of the chemical reaction that causes this issue, check out FilmCare.org’s page on redox.
If you determine that your microfilm has redox, the method to staunch the progression of deterioration is to use a brown toner. Straight from the “Use of KODAK Brown Toner to Extend the Life of Microfilm” user manual, here’s a great description of what brown toning does for your film:
“Brown toning is a chemical treatment that changes the film’s processed silver to silver sulfide which is much more resistant to humidity and oxidants. Kodak Brown Toner will not degrade the quality of the microfilm images. After brown toning, areas of redox blemishes may be clear or change to a more neutral color. Although the name “brown toners” suggests a browner image after toning, this is not true for microfilm. In fact, after brown toning, areas of density may appear blacker or more neutral in color. Brown toning does not affect the D-min or clear areas of the film when washed properly.”
Summed up, brown toning may clear up some of the redox blemishes on your microfilm and may create a more resistant microfilm to protect against further corrosion.
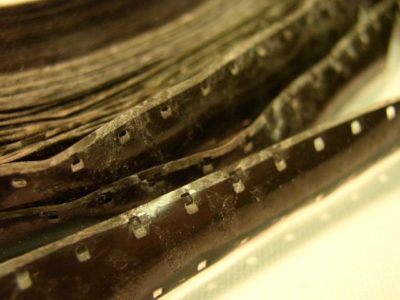
My Microfilm Is Flaking And Falling Apart
“Embrittlement”
When the elasticity of your film is reduced, it causes the film to become brittle. The film is less pliable and not as capable of withstanding the strain of bending and twisting, even snapping or breaking if handled too roughly. Take a look at FilmCare.org’s description of embrittlement for a detailed description of how embrittlement happens.

Once your film becomes embrittled, you cannot reverse the effects. You may be able to use solutions that temporarily provide additional elasticity, which will allow you time to duplicate or digitally convert your film, but the film will eventually return to its embrittled state.
What Can I Do To Prevent Microfilm Deterioration?
The key method to protect your microfilm against most causes of degradation and deterioration is proper microfilm storage. This includes maintaining a temperature that doesn’t exceed 70°F with a relative humidity that should be less than 50%. To ensure the longevity of your microfilmed records, they should be stored in a stable environment that’s as cold and dry as possible.
In addition to temperature and humidity, you should protect your materials from light and pollutants; when not in use, limit light exposure and handling. If you’re cleaning or painting the area that your records are located in (just as an example), make sure that the film is well protected or, even better, moved out of the area until the activity is complete. Kodak (they know film) even says that if painting, just get the microfilm out of the room and wait three months to allow the paint to dry before returning your microfilm and microfiche to the storage room.
Below is a summarized version of Kodak’s “10 Ways to Maintain Your Microfilm Records:”
- Pack your microfilm tightly to prevent oxidation.
- Store in a temperature-controlled environment. Temperature should not exceed 21°C (70°F).
- Control moisture and keep humidity below 50%.
- Store your records in a dark place and limit exposure to light.
- Keep your storage facility clean.
- Don’t paint rooms without removing your microfilm first. Allow three months for paint to dry before replacing film in storage.
- Don’t store your microfilm in wooden cabinets for the long-term.
- Handle your microfilm carefully, and use gloves as much as is logical to reduce oil residue transferring from your hands to the film.
- Place acid-detection strips (A-D strips) next to your microfilm to catch increases in acetic acid as soon as possible.
- If film shows signs of degradation, determine which form of decay is happening and separate and quarantine film that is affected. This will help mitigate the possibility of other records contracting the issue.
What Can I Do Now?
To check on your microfilm, follow the steps below:
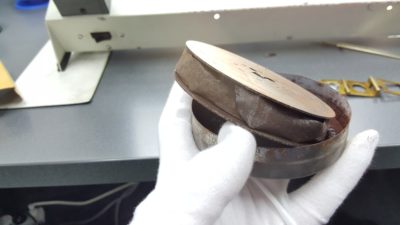
- Go to where your records are stored and take a few minutes and check through some of your microfilm. Grab some reels of microfilm, take them out of their boxes (the cardboard boxes; if you have the ones in the plastic cartridges leave those in the containers unless you want to spend a while trying to put them back), and give them a sniff to check for any vinegar or sour smells. Pull a couple of feet of the roll out to expose the part of the film that has some images on it and check the flexibility of the material. Is it flexible or somewhat brittle? Inspect the microfilm for visual signs of degradation, such as goopiness, mold, or flakes of the film coming off.
- If you have sheets of microfiche, go to your storage facility (even if it’s a closet in your office!) and pull out a few sheets from different locations. Smell the fiche to check for vinegar syndrome then inspect how they look (clean and clear? Moldy? Orange spots all over them). Test the flexibility of the sheets to see if they’re becoming brittle.
Next Steps
Reach out to us today! Click the “Get Your Quote” button below, fill out the form, and we’ll quickly reply to you to discuss your project.
Further Reading
If you think that a digital scanning project is the best way for you to preserve your microfilm and microfiche records from permanent loss, you may want to take a few minutes to look through some of our other articles. Here are some recommendations:
“How Much Does Microfilm Scanning Cost?” describes the 9 factors that affect your scanning price. This is a great place to start to get a ballpark idea of what you might pay if you decide to digitally convert your microfilm collection.
“The BMI Microfilm Scanning Process” is our 10-step method to track, test, and scan your microfilm records. If you send your microfilm to us, this is what it’ll experience.
“Why Should I Hire A Scanning ‘Expert?’” reviews the logistics of a digital scanning project so that you have the knowledge to make a decision to either scan your microfilm yourself or work with a company like us.